|
|
|
Top Rated Seller
Payment options

Follow us on social media
Official dealer


This site is protected by reCAPTCHA and the Google
Privacy Policy and
Terms of Service apply.
A Beginner’s Guide to Filament Printing
Whilst 3D printers are fast becoming more affordable and available to everyone, there may be a few things stopping you from making the jump into the world of 3D printing.
The aim of this guide is to help you to better understand how a 3D filament printer works and how to 3D print.
Introduction to Filament Printing or FDM (Fused Deposition Modelling)
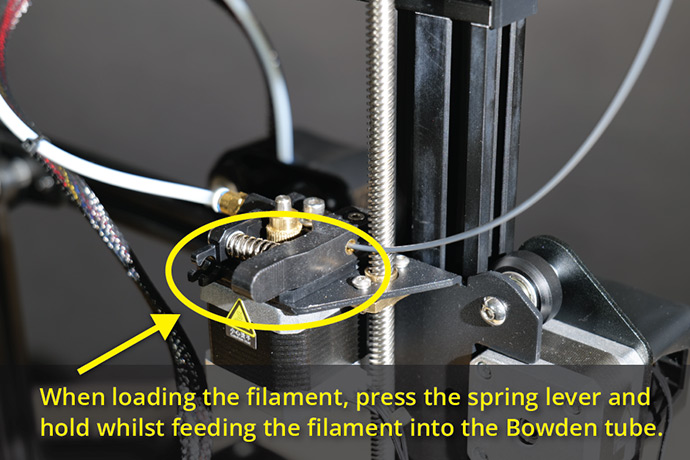
Most people start with filament-based printing. Although the process can be slow, filament printing can produce strong and practical models. Over time, users gain a good understanding of the process and how it works. Filament printers work by feeding plastic filament into an extruder. The extruder is heated to the given temperature required for the material being printed.
PLA is the most common starter 3D printer filament. It prints at a range from 190 to 210 degrees C. The build plate needs to be heated to around 50 to 60C, this helps the print to cool slowly. It also prevents the print from warping or coming off the bed. Both values are adjustable in the slicer but if you’ve selected the right material in the slicer, then you can print with the default settings until you’re more confident adjusting them.
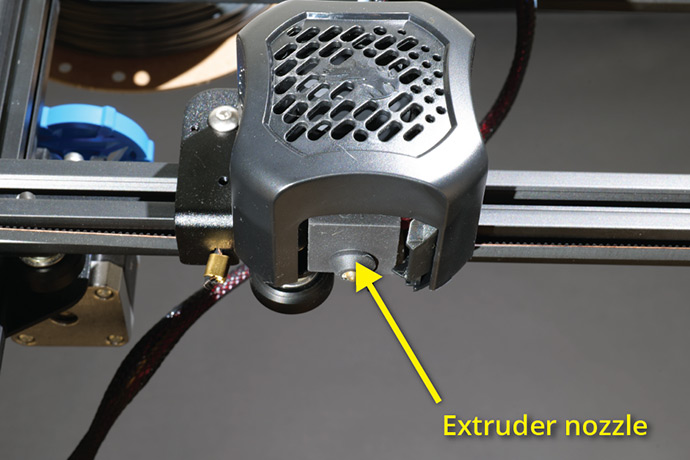
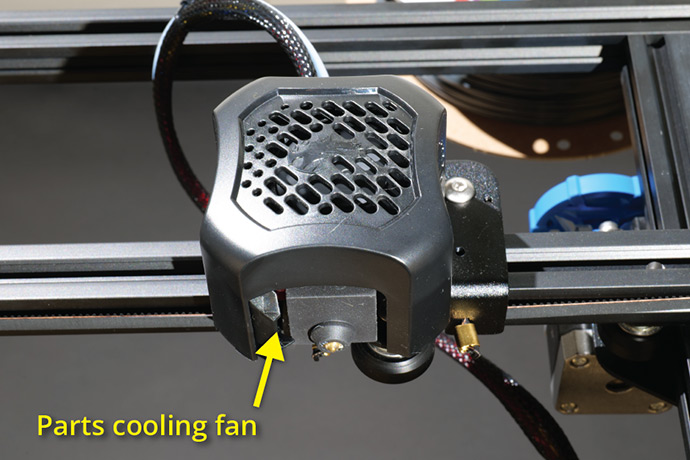
The nozzle of the extruder moves over the build plate with a small gap of around 0.2mm, to enable the melted filament room to flow from the extruder. The printer then moves on the given path, building up layers of the melted filament. The extruder is fitted with a parts cooling fan, so as the model grows, the fan cools the layers ready to support the next layer.
To start 3D printing you don’t need to have any design or CAD experience. The internet is full of files that are readily available to download, slice and print - it really is that easy!
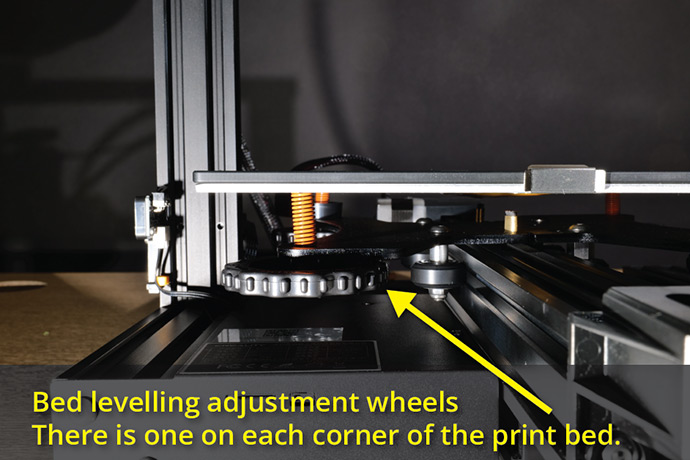
Once you have your printer set up, you will first need to level the print bed. We don’t mean with a spirit level but all planes of the build plate should be parallel to the extruder. So, in simple terms, wherever the nozzle is on the build plate, the distance is the same at any point.
Now you can download your first file ready to slice.
Thingiverse is a great source of free files to download and print. Find your model and read any notes that may be listed in the description. This may provide useful information about the print from the designer. These notes may include support and advice on how to place the model on the build plate, for example.
When you have downloaded the file, you might need to extract it. Be careful to ensure that all the model parts are extracted to the same folder.
Next you need to open the file parts in your chosen slicer software. Again, we have a couple of options for this and both are free, open-source programs. First up is Ultimaker Cura. This is a great program with plenty of functions. Then we have PrusaSlicer, again a very feature packed piece of software. Either one will be suitable and either one will work very well.
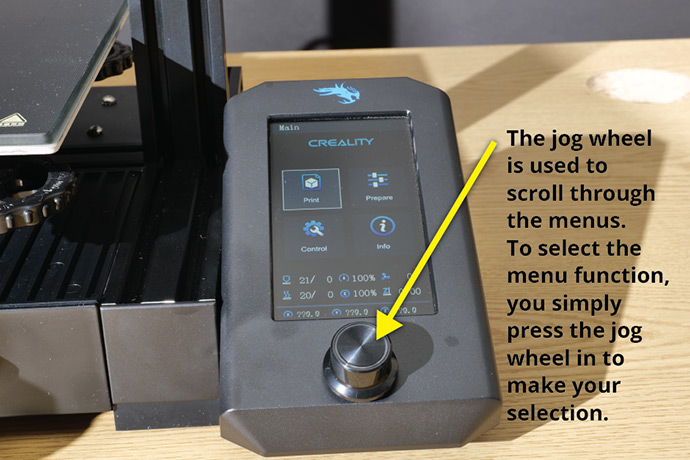
Once you have decided what slicer to use and you’ve downloaded it, you must now set up the software. Follow the instructions and select the correct 3D printer from the menu. These are very good presets, so you won’t have to change anything.
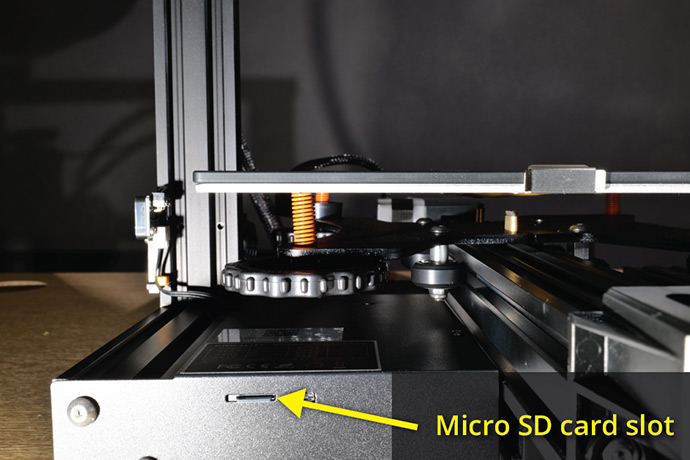
Now import your model into the slicer and when it’s open you will see the 3D model appear on the build plate in the slicer. Once you are happy with the way the model is placed and any supports have been added, you’re ready to slice the model. Slicing the model cuts it into layers, so the printer knows what to do. When you press the slice model button and the process has finished, you are now ready to save the sliced file onto your SD card or USB stick.
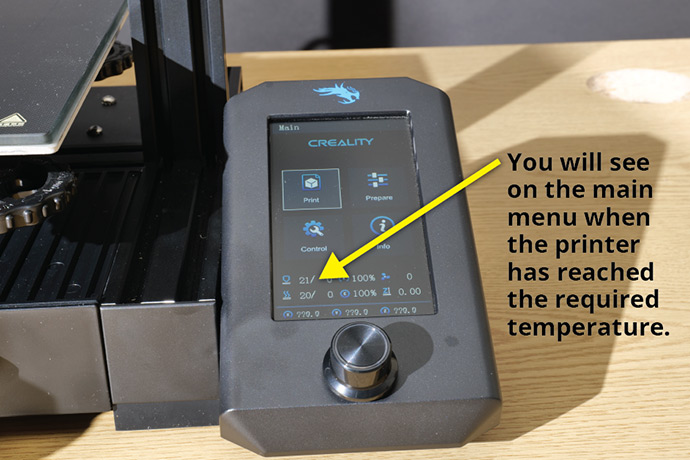
Insert the SD card or USB stick into the printer and preheat the 3D printer via the menu. When the printer has reached the correct temperature, you’re ready to start printing.
From the printer menu select print, then select the file that you want to print. Ensure your printer is loaded with filament and that the print bed is clean. Then press print and the printing process will begin.
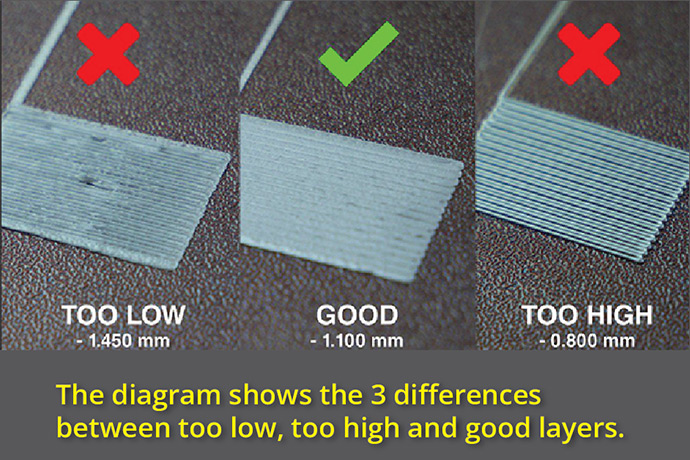
Always watch the first layer or so go down. The first layers are the most important as they are the foundations for the full print. You are looking for a good clean even layer across the print area. If you notice the lines of filament don’t squish together, then the nozzle is too far from the print bed. If this is the case, go to the tune menu of your printer and scroll until you find the Z offset setting.
To lower the nozzle you want a minus value, but only very small adjustments should be made until you reach the desired layer. Again, if you are too close with the nozzle you might notice the nozzle dragging on the filament. The same process as before should be followed, but this time you want a positive value adjustment.
Then when you are happy with the first layers, leave the printer to it.
Once your 3D print has finished and cooled down, you can remove it from the build plate, clean off any supports and you’re done. The print can then be lightly sanded and painted if required or if you like the printed finish, then leave it raw.
Congratulations, you have now downloaded, sliced and printed your first 3D model!
At 123-3D.co.uk we stock a wide range of 3D printers, 3D printing filament and more.
The aim of this guide is to help you to better understand how a 3D filament printer works and how to 3D print.
Introduction to Filament Printing or FDM (Fused Deposition Modelling)
Most people start with filament-based printing. Although the process can be slow, filament printing can produce strong and practical models. Over time, users gain a good understanding of the process and how it works. Filament printers work by feeding plastic filament into an extruder. The extruder is heated to the given temperature required for the material being printed.
PLA is the most common starter 3D printer filament. It prints at a range from 190 to 210 degrees C. The build plate needs to be heated to around 50 to 60C, this helps the print to cool slowly. It also prevents the print from warping or coming off the bed. Both values are adjustable in the slicer but if you’ve selected the right material in the slicer, then you can print with the default settings until you’re more confident adjusting them.
The nozzle of the extruder moves over the build plate with a small gap of around 0.2mm, to enable the melted filament room to flow from the extruder. The printer then moves on the given path, building up layers of the melted filament. The extruder is fitted with a parts cooling fan, so as the model grows, the fan cools the layers ready to support the next layer.
To start 3D printing you don’t need to have any design or CAD experience. The internet is full of files that are readily available to download, slice and print - it really is that easy!
Once you have your printer set up, you will first need to level the print bed. We don’t mean with a spirit level but all planes of the build plate should be parallel to the extruder. So, in simple terms, wherever the nozzle is on the build plate, the distance is the same at any point.
Now you can download your first file ready to slice.
Thingiverse is a great source of free files to download and print. Find your model and read any notes that may be listed in the description. This may provide useful information about the print from the designer. These notes may include support and advice on how to place the model on the build plate, for example.
When you have downloaded the file, you might need to extract it. Be careful to ensure that all the model parts are extracted to the same folder.
Next you need to open the file parts in your chosen slicer software. Again, we have a couple of options for this and both are free, open-source programs. First up is Ultimaker Cura. This is a great program with plenty of functions. Then we have PrusaSlicer, again a very feature packed piece of software. Either one will be suitable and either one will work very well.
Once you have decided what slicer to use and you’ve downloaded it, you must now set up the software. Follow the instructions and select the correct 3D printer from the menu. These are very good presets, so you won’t have to change anything.
Now import your model into the slicer and when it’s open you will see the 3D model appear on the build plate in the slicer. Once you are happy with the way the model is placed and any supports have been added, you’re ready to slice the model. Slicing the model cuts it into layers, so the printer knows what to do. When you press the slice model button and the process has finished, you are now ready to save the sliced file onto your SD card or USB stick.
Insert the SD card or USB stick into the printer and preheat the 3D printer via the menu. When the printer has reached the correct temperature, you’re ready to start printing.
From the printer menu select print, then select the file that you want to print. Ensure your printer is loaded with filament and that the print bed is clean. Then press print and the printing process will begin.
Always watch the first layer or so go down. The first layers are the most important as they are the foundations for the full print. You are looking for a good clean even layer across the print area. If you notice the lines of filament don’t squish together, then the nozzle is too far from the print bed. If this is the case, go to the tune menu of your printer and scroll until you find the Z offset setting.
To lower the nozzle you want a minus value, but only very small adjustments should be made until you reach the desired layer. Again, if you are too close with the nozzle you might notice the nozzle dragging on the filament. The same process as before should be followed, but this time you want a positive value adjustment.
Then when you are happy with the first layers, leave the printer to it.
Once your 3D print has finished and cooled down, you can remove it from the build plate, clean off any supports and you’re done. The print can then be lightly sanded and painted if required or if you like the printed finish, then leave it raw.
Congratulations, you have now downloaded, sliced and printed your first 3D model!
At 123-3D.co.uk we stock a wide range of 3D printers, 3D printing filament and more.